Sunday, July 28, 2013

Cleaning Up - Week 4: Cleaning Tips & Tricks

This week, we are going to focus on some of those odd cleaning jobs around the house. I checked out the web to see other people's solutions to some of these cleaning conundrums, tried them out, and have included my results and opinion on each one! 

Washing Pillows
First I removed the pillow cases and checked the tags to make sure my pillows could be machine washed. Then I set up my washer like I would for a normal wash. I set it on HOT, chose the Regular Heavy cycle, and added my detergent. I added 2 pillows to balance the load and ran them through two cycles, flipping the pillows over before the second cycle. To dry them, I set my dryer on low heat (per the instructions on the pillows), and put in two dryer balls. The yellow spots came out and the pillows were much fluffier than when I put them in. The pillows were also a little lopsided, like the filling moved around, but I think it is just the type of pillows we have. Overall, I was pleased with how they turned out. (The pictures really don't do it justice).

Cleaning Grout
I am not sure the grout in our house was ever cleaned by the previous owners and was looking pretty dingy. I found many different cleaning methods for cleaning grout (besides expensive smelly chemicals). I tried using baking soda and vinegar because that is what I had on hand. First I sprinkled baking soda onto the grout and spread it around to make sure it was completely covered. I filled a spray bottle with vinegar and sprayed it on the baking soda. I let it sit for a few minutes and then scrubbed with a grout brush. After I was done, I cleaned up with a combination of vacuuming and wiping with a rag multiple times. I did notice that it was very difficult to get ALL of the baking soda up. This process was VERY messy, but I was pleased with the results nonetheless.

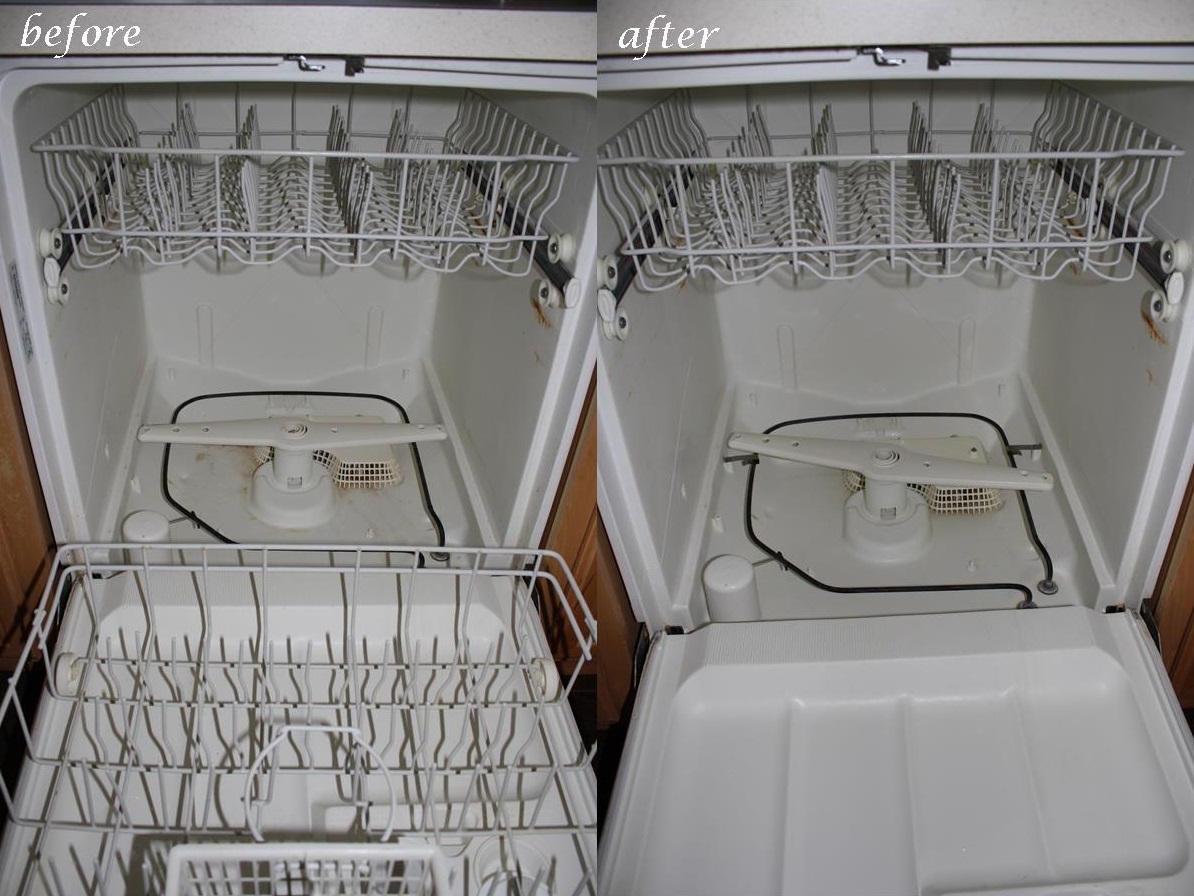
Cleaning the Dishwasher
This one may have been the most disgusting for me to do. Our dishwasher is as old as our house (over 12 years) and I am not sure anyone ever cleaned it before. First I wiped it down with a wet rag (top, bottom, sides, even where the door meets the main compartment). Then, I filled a glass measuring cup with white vinegar and placed it in the middle of the top rack. It was the only dish in there. I ran the dishwasher like normal. When the cycle was finished, I wiped it down with a wet rag again. Overall, I felt like wiping it with a rag made more of a difference than the vinegar. I did not notice a strong vinegar smell. Our dishwasher has some rust spots that I could not get out, but oh well. I also read that some people just put the vinegar right in the bottom of the dishwasher.

Cleaning the Oven
The was the most frustrating task I attempted. First, I took out the shelves in the oven. Then I put some baking soda in a bowl (about 3/4 cup) and slowly added water while stirring occasionally. My goal was to get a paste the thickness of pancake batter. Then I smeared the paste all over the interior of the oven - door, glass, sides, back, and bottom. I left it on there for about 15 minutes and while I was waiting, cleaned the oven racks with soap and water. Then I wiped the oven clean with a damp cloth. Oh. My. Gosh. This was messier than cleaning the grout with baking soda! It took me about 15 minutes just to wipe it clean. I really don't feel like the baking soda "cleaned" more than wiping it down did. Oh well, it at least looks better than before I started!

Cleaning Plastic Shower Liners
I was hesitant on this one, but tried it anyways because our shower liner was pretty nasty! I put the shower liner in the washer with some old towels and about a cup of white vinegar. I put the water temp on HOT and regular cycle. I tried to make it so the towels were touching as much of the surface on the liner as possible. After it was done washing, I hung the liner back on the rod to dry. Overall, I could tell it got the soap scum off. It did get kind of wrinkled, but I am okay with that!


Cleaning the Microwave
One of my favorite tricks. Put a small bowl of water in the microwave and "cook" it for a few minutes (I usually do 5 minutes). Then remove the bowl and wipe the microwave clean! The steam loosens all the gunk.


Well, that concludes this series on cleaning. I hope you have enjoyed it as much as I have. I had fun trying new things and getting motivated to clean up!

Sunday, July 21, 2013

Cleaning Up - Week 3: Cleaning Green

Have you ever read the fine print on your cleaning products? You may be surprised by what you find. For Week 3 of our cleaning series, we are going to explore the world of "green" cleaning.


Microfiber Cloths
This was the first "green" cleaning switch I made. I felt like I was wasting so many paper towels when I would clean. I had heard good things about microfiber cloths and decided to try them for myself. I bought the Quickie - Clean Results Microfiber 18 Pack All Purpose Towels from Lowes for $12.98. I love them, especially for cleaning mirrors and windows. I would always have streaks when I cleaned with paper towels, but with the microfiber cloth, my mirrors have never looked better! I like that they don't leave any lint behind. I have also attached a microfiber cloth to my Swiffer to clean windows I can't reach by hand and also for cleaning our floors. Just throw them in the wash when they get dirty. They are so versatile! I have seen these come in packs that have their use embroidered on them (kitchen and bathroom, stainless steel, glass and window, dusting and polishing). If you don't feel like you need an 18 pack, I have seen them at Bed Bath Beyond for as low as 99¢.

Dryer Balls
I hate dryer sheets. I think if they dissolved in the dryer, I wouldn't mind them as much, but pulling out a used dryer sheet and throwing it away just kills me. Also, I wanted an alternative for drying baby clothes without chemicals. So I bought a 2 pack of Dryer Max Dryer Balls from Bed Bath and Beyond for $6.99. (I couldn't find them on BB&B's website, but here they are at Target). I am very pleased with them. Usually when I dry sheets, I have to run the dryer a little bit longer because they are still damp. When I used the dryer balls, I did not have to do that. My sheets were still fluffy too. My only complaint would be that they are a little loud as they tumble around the dryer, but we just close the laundry room door.

Glass Cleaner
Skip the Windex, just use water! I have a squirt bottle filled with water for cleaning my windows and mirrors. Paired with my microfiber cloths, my mirrors and windows still get clean and it's one less chemical that I have to use. You can buy an empty spray bottle (check the dollar stores) or you can just refill an old Windex bottle. I have also seen smaller empty spray bottles in the hair section and travel sections of the big box stores.

Homemade Cleaners
I recently started exploring making my own cleaning solutions when I noticed how bothered I was by the smell of the all-purpose cleaner I was using. Sometimes it even gave me a headache. I did a bit of research before making anything and bought a few items such as an empty squirt bottle, a cheese grater, and some cheap measuring cups and spoons. I found all of these items at the dollar store. Here is what I made:

Laundry Detergent
20 Mule Team Borax: $3.49
Arm & Hammer Washing Soda: $3.29
Fels-Naptha Laundry Bar: $1.09
I searched the web for different recipes and found each one had these common elements: soap flakes, washing soda, and borax. I found all three of these items in the laundry section of my local Meijer and it cost around $8 total (much cheaper than a bottle of detergent!). I grated the Fels Naptha bar with a cheap cheese grater (took at least 10 minutes to grate!). Then I added 2 cups of 20 Mule Team Borax and 2 cups of Arm & Hammer Washing Soda, put it in an airtight container and mixed it all together. I use 2 tablespoons in my laundry. Everything comes out nice and clean! I have a top load washer, but I have read for front load washers, it works best to just put the mixture directly in the washer instead of the dispenser.

All-Purpose Cleaner
This cleaner was the reason I wanted to try homemade cleaners in the first place. I used:
   2 cups of Water
   1/2 teaspoon Dish Soap
   1 teaspoon Baking Soda
   2 tablespoons White Vinegar
   3 drops of Essential Oil
I already had all of those ingredients at home with the exception of the essential oil. I went to GNC to find essential oils. They had quite a few to choose from. I like lemon so I went with that one. It cost $5.99 for a little bottle. I put all of the ingredients into a spray bottle and mixed them up. (I accidentally did not close the spray part, so when the baking soda and vinegar combined, my mixture started shooting out of the spray part! Oops!) I smelled it without the essential oil added because I wanted to see if I needed to add it; it smelled like a dish soap and vinegar combination, which didn't smell very pleasant, so I was glad I had the essential oil in the end. I used an apple scented dish soap and I wish I would have used lemon scented instead to bring more of the lemon smell out. Overall it seems to work nicely. I have read online that the vinegar and baking soda cancel each other out after a while. I have seen other recipes that replace the baking soda with borax instead. I have not tried that yet, maybe next batch.

Toilet Bowl Cleaner
I also saw a lot of different recipes for toilet bowl cleaner on the web, but decided to try this one. It takes 1/4 cup vinegar and 10 drops of essential oil (to help with that nasty vinegar smell). To use it, you sprinkle some baking soda in the bowl, squirt with the vinegar and oil and clean with a toilet bowl brush. Overall, I thought this recipe worked well. You really don't need to use that much of the vinegar and oil mixture, I used just enough to hear the baking soda and vinegar fizz. I decided that I wanted a squeeze bottle for the cleaner, so I got a clear condiment bottle from Garden Ridge. It was $2.99 for a 3 pack. My only complaint is it is always open (there is not cap on the top)! I didn't think about that until afterward. I will probably transfer it to an old toilet bowl cleaner bottle after one gets used up.

Any other suggestions on going "green" with your cleaning?

Next week, we will finish the series with cleaning tips and tricks!

Monday, July 15, 2013

What's Cooking: Chicken Pot Pie Puffs

 
A different spin on this classic comfort food. Easy and quick to make.

Ingredients:
- 2 cups frozen mixed vegetables, thawed
- 1 cup diced cooked chicken
- 1 can (10 oz) condensed cream of chicken soup
- 1 can (16 oz) refrigerated biscuits
Cooking Directions:
1. Preheat oven to 375°F.
2. Combine thawed vegetables, cooked chicken, and soup in a bowl and mix well.
3. Flatten each biscuit with a rolling pin into 5-inch rounds.
4. Put the flattened biscuits in the cups of a greased regular-size muffin pan (you will have some empty cups). Press the bottom and sides of the biscuits to be flush with the sides of the muffin cup, letting at least 1/2 inch to overflow above the rim.
5. Put a generous amount of the chicken mixture (about 1/3 cup) in each biscuit cup.
6. Pull the edges of each biscuit to the center and pinch to seal the biscuit shut.
7. Bake for 20 minutes or until biscuits are golden brown. Cool 1 minute and remove from pan.
Source: www.pillsbury.com

Sunday, July 14, 2013

Cleaning Up - Week 2: Stock a Cleaning Caddy

Now that we have a cleaning schedule in place, lets gather what we need to tackle these tasks. For Week 2 of our cleaning series, we are going to stock a cleaning caddy that will be easy to carry from room to room.


My cleaning caddy includes: Paper Towels, Toilet Bowl Cleaner, Toilet Bowl Brush, Duster, Glass Cleaner, Rubber Gloves, Microfiber Cloths, Sponge, All-Purpose Cleaner, Shower Foam, Grout Brush, and Cleaning Wipes.

I got my caddy from Bed Bath and Beyond. It is the Casabella Nesting Storage Caddy. It cost $5.99 and nests in a 4-gallon bucket (which I did not purchase). In addition to my cleaning caddy, I have a vacuum cleaner, dustpan and broom, wet-cloth mop, and an extendable duster.

The magazine Real Simple suggests there are only 20 products you need to clean your entire house:
1. Microfiber Cloth - they are machine washable and can handle any chore
2. Toilet Brush - would you rather clean that toilet with your hand?
3. Scrub Brush - for burned food in the oven, soot in the fireplace, and tile needing scouring
4. Spray Bottle - to contain homemade cleaners
5. Rubber Gloves - to protect your skin
6. Toothbrush - for those tiny hard-to-reach areas like around the base of the bathroom faucet
7. Dry-Cleaning Sponge - attracts soot, dust, and pet hair without chemicals
8. Squeegee - leaves mirrors and shower doors streak-free
9. Broom - for those crumbs on the floor
10. Sponge Mop - for wet messes like muddy paw prints
11. Disinfecting Wipes - for quick cleaning like kitchen counters and table
12. Mild Abrasive - helps break down scum on tile and tubs
13. Dust Mop - because dust seems to come from nowhere, yet be everywhere
14. Extendable Duster - skip the ladder to reach cobwebs on fans and ceilings
15. White Vinegar - for mineral deposits on faucets and windows
16. Dishwashing Liquid - cleans just about anything
17. Vacuum - for carpets, curtains, and furniture
18. All-Purpose Cleaner - breaks down grease and prevents dirt from redepositing
19. Baking Soda - eliminates odors
20. Caddy - to keep all your cleaning products

Do you already have a cleaning caddy or bucket? What do you keep in it?

Next week, we will take a look at how to clean "green."

Sunday, July 7, 2013

Cleaning Up - Week 1: Create a Cleaning Schedule

Just thinking about cleaning the entire house in one day makes me exhausted. For Week 1 of our cleaning series, we are going to make the task of cleaning a little less daunting by creating a cleaning schedule. Having a cleaning schedule allows you to tackle a little bit each day. It also reduces the amount of cleaning you have to do if company is coming over on short notice. Anything that reduces stress in life is welcome in my mind!

There are many different ways you can create a cleaning schedule. I have my cleaning tasks split into Daily, Every Other Week, and Deep Clean.

DAILY
Make Beds, Wash Dishes, Wipe Kitchen Counters and Table, Tidy Clutter
With the exception of making the beds, I do these tasks right before I go to bed. By doing this, I wake up feeling like I can truly start my day instead of having these simple tasks already on my to do list.

EVERY OTHER WEEK
Week 1:                                          Week 2:
Mon - Garbage/Recycling             Mon - Garbage/Recycling
Tues - Master Bath                        Tues - Microwave/Toaster
Wed - Half Bath                             Wed - Dust
Thurs - Guest Bath                        Thurs - Vacuum
Fri - General Laundry                  Fri - Sheets & Towels
I felt like cleaning the same areas every week was too much, so I created my weekly cleaning schedule to operate over a two week period. This allows me to be able to spread out the tasks over 10 days instead of just 5. You'll notice I don't have anything scheduled for Saturday or Sunday. I use Saturday as a catch up day (it is rare that I actually do every task on its assigned day for an entire week) and also for my Deep Clean tasks (more on that later). I think Sunday should be spent with family, so that is why nothing is scheduled on that day.

DEEP CLEAN
January: Office                  July: Family Room
February: Coat Closet       August: Master Bedroom
March: Kitchen                  September: Guest Bedroom
April: Pantry                      October: Kids Bedroom
May: Garage                      November: Bathrooms
June: Living Room             December: Laundry Room
I have devoted one room for each month of the year. It just so happened to work out perfectly for the number of rooms we have in our house. When I say deep clean, I am talking about the tasks you probably wouldn't do every week, like wiping blinds and baseboards, cleaning the fridge, freezer, and stove, etc. Now yes, I realize some of you just realized I only have scheduled once a year to clean my fridge (in March, when I have scheduled to clean the kitchen). If it is July and I notice the fridge could use a good cleaning, I am more than likely not going to wait until March to clean it and that is okay. But by having a schedule, I know it will get cleaned at least once a year. 

Printable Check Sheets
I have created check sheets for my cleaning schedule so that I can mark off when I complete each task. It helps me keep track of what I have done, in case I miss a day. Also, I don't do all of my Deep Clean tasks on one day, so I have a check box for each type of task for each room. I have included my check sheets for you here. Feel free to follow my schedule and print them as they are (Weekly or Deep), or download and edit them to fit your family (weekly Schedule is on the first tab and the Deep Clean Schedule is on the second). Below are previews of the printable schedules:


Test Your Schedule
Commit to your cleaning schedule for at least a month. At the end, evaluate what worked and what didn't work and make changes accordingly. You may find that it makes more sense for you to vacuum the upstairs and downstairs on different days, or clean the guest bathroom only when company comes because nobody in your house uses it.

Cleaning Schedule Alternative
If you don't want to get this detailed in creating a cleaning schedule, commit to cleaning for a set amount of time each day. Set a timer for 15 or 30 minutes. Whatever you can get done in that amount of time is what gets done.


Next week, we will cover stocking a cleaning caddy.

Saturday, July 6, 2013

Cleaning Up: The Series

I am so excited to share a blog series for the month of July all about cleaning! Starting tomorrow, look for these posts:

Week 1: Create a Cleaning Schedule
Week 2: Stock a Cleaning Caddy
Week 3: Cleaning Green
Week 4: Cleaning Tips & Tricks

Friday, July 5, 2013

What's Cooking: Homemade Pizza


Friday night is pizza night! This was my first attempt at homemade dough and yeast. Turned out pretty good!

Ingredients:


- 2-1/2 to 3 cups all-purpose flour
- 1 envelope Fleischmann's® RapidRise Yeast
- 3/4 teaspoon salt
- 1 cup very warm water

- 2 tablespoons cooking oil
- Cooking spray
- Cornmeal

- Pizza toppings

Cooking Directions:
1. Combine 2 cups flour, yeast, and salt.
2. Stir in very warm water and cooking oil.
3. Stir in more flour to make a soft dough.
4. Knead (fold, push, turn) dough on a lightly floured surface until smooth and elastic (4-6 minutes).
5. Cover dough with a cloth and let it rest on the floured surface for about 15 minutes.
6. Spray cooking spray on a large pizza pan and sprinkle with cornmeal.
7. Flatten dough with a rolling pin to fit your pizza pan.
8. Bake dough in a preheated 400oF oven for 10 minutes.
9. Remove from oven and add toppings.
10. Return pizza to oven for 10 to 20 minutes or until done.

We used a 15 oz can of Muir Glen Organic Pizza Sauce and found it to be waaaay too much sauce for one pizza. We also topped our pizza with some shredded mozzarella cheese, pepperoni, and more mozzarella cheese.


Here is a helpful video to see how the dough should look:

Source: www.breadworld.com

Wednesday, July 3, 2013

My Shopping Trip: Target

Our Target just recently added fresh groceries, so I decided to do some grocery shopping there. Also, I wanted to try stacking with mobile coupons and Target Cartwheel Offers. The Target Coupon Policy states that you can use one Manufacturer Coupon, one Target Coupon (mobile or printable), and one Target Cartwheel Offer on one item.
 
You'll notice that the apple juice I bought is not pictured above. That's because I left it in the cart and didn't realize it until I got home. Oops! Luckily, I called Target and they had it for me at guest services. :)

Transaction:
(1) Market Pantry Apple Juice (64 oz) @ $2.00
(1) Market Pantry White Bread (20 oz) @ 1.29
(1) Driscoll's Strawberries (1 lb) @ $1.79
(1) Ground Chuck (1 lb) @ $2.49
(4) Sweet Corn @ $0.25 each
(1) Hormel Ribs @ $1.99/lb
(5) Edy's Ice Cream (1.5 qt) @ $2.99

Coupons Used:
-$1 off Archer Farms or Market Pantry purchase of $2 or more (Target Mobile Coupon, text FRESH to 827438)
-5% Off Market Pantry Juice, 64 oz (Target Cartwheel)
-$1 off Any Brand Sandwich Bread (Target Mobile Coupon, text FRESH to 827438)
-5% Off Market Pantry Sandwich Bread, White or Wheat (Target Cartwheel)
-$0.50/1 – Driscoll’s Product (www.driscolls.com)
-$1 Fresh Fruit Purchase of $1 or more (Target Mobile Coupon text SAVVY to 827438)
-$1 1-lb pkg all natural ground round 85% lean beef (Target Mobile Coupon text SAVVY to 827438)
-5% Off 1 lb. All Natural Ground Beef (Target Cartwheel)
-$1 off Fresh vegetable purchase of $1 or more (Target Mobile Coupon, text FRESH to 827438)
-$1 off Fresh meat purchase of $1 or more (Target Mobile Coupon, text FRESH to 827438)
(2) -$1.50/2 – Dreyer’s Branded Product, 48 oz or larger (www.walmart.com)
-$1 off $1 or higher frozen food purchase (Target Mobile Coupon, text FRESH to 827438)

OOP $17.72 + $5 Target Gift Card for buying 5 participating frozen treats
Saved $26.80