Thursday, November 7, 2013

Money Saving Apps: GasBuddy

I really hate it when I get gas and then drive a mile down the road past another gas station and see the price is 10 cents cheaper! I realize that if I got 10 gallons of gas, I only would have saved $1.00, but over time it adds up. By using the GasBuddy app, we can find the cheapest gas prices in town!

Steps to Use GasBuddy:
1. Download the app to your device. It is available for Apple, Google, Windows, and Blackberry phones. The app may ask you to create an account, but you do not need one to use the app.
2. In the app, you can either search for gas stations by city, state, or ZIP, or have the app use your location to find the stations closest to you using GPS.

3. Once it has the closest gas stations pulled up, you can sort them by distance or price, or even fuel grade. You can also view the gas stations on a map.

4. Select a gas station and view more information such as the address, phone number, and features (such as if they have restrooms, a convenience store, or an air hose). You can also get directions to the gas station through your phone.


Why I Love this App:
- Even if you are in an unfamiliar city, you can find the cheapest gas stations.
- I like being able to search on the map to see where along my route is the cheapest gas, even if it is over 100 miles away.
- If you have notifications set up, you get an alert notifying you that prices are going up in your area.

Tuesday, November 5, 2013

Money Saving Apps: Amazon Price Check

I give the Amazon Price Check App a good workout in the weeks before Christmas. It allows me to compare prices I find in the store with prices on Amazon.


Steps to Use Amazon Price Check:
1. Download the app to your device. It is available for iPhone, iPod touch, and Android.
2. Either type the name, scan the barcode, take a picture, or say the name of the product you want to find.


3. Compare prices on Amazon with the price in the store.

Why I Love this App:
- Helpful during holiday season to make sure I am getting the best price on gifts.
- You can share information on a product via e-mail, text, Facebook, or Twitter.
- You can connect the app to your Amazon account and add items to your cart.
- If you have an account, you can buy items right from the app.
- I have seen people use this app at garage sales...usually to see if they can resell the item for more.

Sunday, November 3, 2013

Money Saving Apps: Target Cartwheel

I already love Target enough as it is, but they recently launched an app through Facebook that made me love it even more! It is called Target Cartwheel.

Steps to Use Target Cartwheel:
1. You will need a Facebook account to use Target Cartwheel. If you don't already have one...get one, even if you only use it for Target Cartwheel.
2. Go to the Target Cartwheel website and log in through your Facebook account. A box will pop up telling you that "Cartwheel by Target would like to post to Facebook for you." Unless you want your Facebook filling up with offers you select, I suggest you choose "Skip." (You could also change it so only you see your posts from Target Cartwheel by selecting "Only Me")
3. Find coupons you want to add by searching or browsing. Click on the offer you want (called an offer card) and it will flip over. Select add. A little red check mark will appear in the upper right corner.
4. You can add 10 offers at a time, but you can earn more spots by unlocking badges. Badges to unlock include using Cartwheel for the first time at Target and saving $10 with Cartwheel and more.
5. At checkout, have the cashier scan your Cartwheel bar code. Either show them your mobile device with the bar code from the Target Cartwheel app (available through the Apple Store or Google Play), or print your Target Cartwheel offers from home and your bar code will be at the top of the print out. Your bar code never changes, so in theory, you could print out your bar code one time and reuse it...almost like a store loyalty card.

Why I Love this App:
- You can redeem all the offers you have loaded at the time of your transaction. So if you have 10 offers loaded, you will save on all 10 items that correspond with those offers.
- You can use each offer up to 4 items in a single transaction.
- Offers do not disappear until they expire...meaning you can use them over and over.
- You can use Target Cartwheel 6 times per day.
- You can use a manufacturer coupon, a Target coupon (mobile texts or printable), and one Cartwheel offer on a single item.
- You can also still use your Target REDcard on top of all those other coupons.

If I am roaming through Target (which I usually do), and I find something that I wasn't planning on buying before I saw it in the store, I will hop on the Target Cartwheel mobile app and see if there is a corresponding offer available. It can really maximize your savings!

Thursday, October 31, 2013

Money Saving Apps: Ibotta

There are a few apps that I use that help me save additional money on top of my coupons that I want to share with you over the coming weeks. The first one is called Ibotta. It is a free rewards app where you can earn cash back for purchasing certain products...kind of like a rebate.

Steps to Use Ibotta:
1. Create an account here.
2. Download the app to your device. It is available for Apple and Android products...even iPod touch and iPad (if you don't have a smartphone).

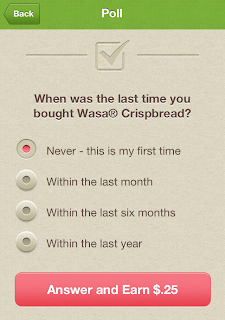
3. Choose an offer (product) and complete tasks to unlock earnings. Tasks include taking a poll, answering trivia, sharing the offer on Facebook or Twitter (you can always delete the post later), learning a fact, and watching a video to name a few. Each task is worth a different amount of money.
4. Go buy the product (use coupons for even more savings!).
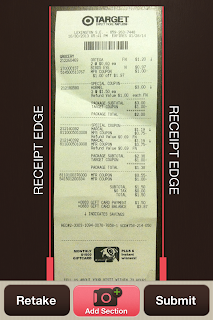
5. Come home, open the app, select "Redeem" and select the store you shopped at (the list pictured is not all of the stores where you can use Ibotta).
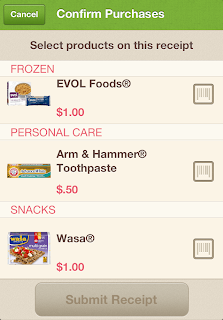
6. Take a picture of your receipt and select Submit (if you have a long receipt, choose "add section"). Select the product you purchased. Scan the UPC barcode and select Submit Receipt!

7. Within 24 hours, your account will be credited. In my experience, my account is usually credited within 15 minutes.
8. After you have accumulated at least $5, you can withdraw cash using PayPal. Or you can donate your earnings.

Why I Love this App:
- I have been using this app for a few months and I have earned over $50.
- You can use manufacturer and store coupons in addition to the Ibotta offers.
- There have been offers for basic items like 1 gallon of any brand of milk. Everybody buys milk!
- There are bonuses available. For example, after you sign up, if you redeem 10 offers in two weeks, you earn a $10 Welcome Bonus! Also, sometimes if you complete a bonus, it unlocks another bonus.
- In addition to the regular offers, there are Store Extras...offers that can only be redeemed at the specified store. Currently, those stores are Smashburger, Whole Foods, Target, Sam's Club, Walmart, and Costco.

Currently Ibotta works at the following chains, but they are always working on adding more:
7-Eleven
Acme
Fresh Market
Bi-Lo
Boyer's
Buehler's
City Market
Costco
Country Mart
CVS Pharmacy
Dillons
Dollar General
Dominick's
Duane Reade
Family Dollar
Food Lion
Food4Less
Fred Meyer
Fry's
Giant Eagle
H-E-B
Harris Teeter
Homeland
Hy-Vee
Ingles
King Soopers
Kroger
Martin's
Meijer
Military Commissary
Pathmark
Pavilions
Pick 'N Save
Piggly Wiggly Midwest
Publix
QFC
Ralphs
Randalls
Reasor's
Redner's Markets
Remke's
Ridley's
Rio Ranch
Rite Aid
Safeway
Sam's Club
ShopRite
Smashburger
Smith's
Stop & Shop
Target
Tom Thumb
Vons
Walgreens
Walmart
Wegmans
Whole Foods
WinCo Foods
Winn-Dixie


Anybody else love this app?

Thursday, October 24, 2013

Just For Fun: Chain Store Maps

Check out these maps! These are the locations of some of the national grocery and drug store chains.

Albertson's
Aldi
CVS
Kroger
Meijer
Rite Aid
Target
Walgreens
Wal-Mart
Whole Foods
Where do you shop?

Wednesday, October 23, 2013

Just For Fun: My Coupon Binder

Standing 2.5 inches high and weighing nearly 5 pounds, here it is in all it's glory...my coupon binder!


There are lots of different ways to organize coupons. I have chosen the whole insert method. Each Sunday when I get my paper, I take out the inserts and write the date on the front of them. When I need coupons for my shopping trips, I go to the date of the insert and cut out only the coupons I am going to use. This saves me so much more time than clipping each and every coupon.

I kind of have 6 sections in my binder, but they are not really labeled. The first part houses store coupons. I use these binder sheet protectors from Staples. Each pocket has a sticky note on it for each store I shop. I use this section to plan for my weekly trips. When I am ready to go to the store, I just grab the coupons for that store from the pocket.

Next, I have whole inserts in standard sheet protectors. They are in date order.


I also have empty sheet protectors ready for new inserts when I get them in the paper.

For loose coupons, I use currency sheet protectors that I bought on ebay. I have them in 4 x 2...

2 x 3 (fits catalina coupons nicely)...


and 3 x 1 (fits printable coupons).


On the first of every month, I go through my binder and take out the expired coupons and move empty sheet protectors to the back. I have been using this method for over a year now and it has worked really well for me.

Wednesday, September 4, 2013

What's Cooking: Pizza Stuffed Chicken

This recipe is good to get that pizza taste without the carbs from the crust. I recommend lining your baking sheet with some tin foil because the melted cheese can get messy!

Ingredients:
- 4 chicken breasts, pounded thin
- mozzarella cheese
- pizza sauce or pasta sauce
- pizza toppings (we used pepperoni for ours)
Cooking Directions:
1. Preheat oven to 375°F.
2. Mix some mozzarella cheese, pizza/pasta sauce, and pizza ingredients in a bowl. I say "some" because you may like more cheese or more sauce in your filling. Also, make sure your pizza ingredients are cut down to a size that can fit inside your chicken breasts.
3. Spread mixture out evenly over chicken breasts.
4. Roll the chicken breasts and place them seam down on a baking sheet.
5. Put more sauce on the top of the chicken breasts. You could also put more pizza toppings on top, like pepperonis.
6. Bake for about 30 minutes or until the chicken is done. I added some mozzarella cheese after 25 minutes and put the chicken breasts back in for 5 minutes to melt the cheese on top.
Source: www.dashingdish.com

Sunday, July 28, 2013

Cleaning Up - Week 4: Cleaning Tips & Tricks

This week, we are going to focus on some of those odd cleaning jobs around the house. I checked out the web to see other people's solutions to some of these cleaning conundrums, tried them out, and have included my results and opinion on each one! 

Washing Pillows
First I removed the pillow cases and checked the tags to make sure my pillows could be machine washed. Then I set up my washer like I would for a normal wash. I set it on HOT, chose the Regular Heavy cycle, and added my detergent. I added 2 pillows to balance the load and ran them through two cycles, flipping the pillows over before the second cycle. To dry them, I set my dryer on low heat (per the instructions on the pillows), and put in two dryer balls. The yellow spots came out and the pillows were much fluffier than when I put them in. The pillows were also a little lopsided, like the filling moved around, but I think it is just the type of pillows we have. Overall, I was pleased with how they turned out. (The pictures really don't do it justice).

Cleaning Grout
I am not sure the grout in our house was ever cleaned by the previous owners and was looking pretty dingy. I found many different cleaning methods for cleaning grout (besides expensive smelly chemicals). I tried using baking soda and vinegar because that is what I had on hand. First I sprinkled baking soda onto the grout and spread it around to make sure it was completely covered. I filled a spray bottle with vinegar and sprayed it on the baking soda. I let it sit for a few minutes and then scrubbed with a grout brush. After I was done, I cleaned up with a combination of vacuuming and wiping with a rag multiple times. I did notice that it was very difficult to get ALL of the baking soda up. This process was VERY messy, but I was pleased with the results nonetheless.

Cleaning the Dishwasher
This one may have been the most disgusting for me to do. Our dishwasher is as old as our house (over 12 years) and I am not sure anyone ever cleaned it before. First I wiped it down with a wet rag (top, bottom, sides, even where the door meets the main compartment). Then, I filled a glass measuring cup with white vinegar and placed it in the middle of the top rack. It was the only dish in there. I ran the dishwasher like normal. When the cycle was finished, I wiped it down with a wet rag again. Overall, I felt like wiping it with a rag made more of a difference than the vinegar. I did not notice a strong vinegar smell. Our dishwasher has some rust spots that I could not get out, but oh well. I also read that some people just put the vinegar right in the bottom of the dishwasher.

Cleaning the Oven
The was the most frustrating task I attempted. First, I took out the shelves in the oven. Then I put some baking soda in a bowl (about 3/4 cup) and slowly added water while stirring occasionally. My goal was to get a paste the thickness of pancake batter. Then I smeared the paste all over the interior of the oven - door, glass, sides, back, and bottom. I left it on there for about 15 minutes and while I was waiting, cleaned the oven racks with soap and water. Then I wiped the oven clean with a damp cloth. Oh. My. Gosh. This was messier than cleaning the grout with baking soda! It took me about 15 minutes just to wipe it clean. I really don't feel like the baking soda "cleaned" more than wiping it down did. Oh well, it at least looks better than before I started!

Cleaning Plastic Shower Liners
I was hesitant on this one, but tried it anyways because our shower liner was pretty nasty! I put the shower liner in the washer with some old towels and about a cup of white vinegar. I put the water temp on HOT and regular cycle. I tried to make it so the towels were touching as much of the surface on the liner as possible. After it was done washing, I hung the liner back on the rod to dry. Overall, I could tell it got the soap scum off. It did get kind of wrinkled, but I am okay with that!


Cleaning the Microwave
One of my favorite tricks. Put a small bowl of water in the microwave and "cook" it for a few minutes (I usually do 5 minutes). Then remove the bowl and wipe the microwave clean! The steam loosens all the gunk.


Well, that concludes this series on cleaning. I hope you have enjoyed it as much as I have. I had fun trying new things and getting motivated to clean up!

Sunday, July 21, 2013

Cleaning Up - Week 3: Cleaning Green

Have you ever read the fine print on your cleaning products? You may be surprised by what you find. For Week 3 of our cleaning series, we are going to explore the world of "green" cleaning.


Microfiber Cloths
This was the first "green" cleaning switch I made. I felt like I was wasting so many paper towels when I would clean. I had heard good things about microfiber cloths and decided to try them for myself. I bought the Quickie - Clean Results Microfiber 18 Pack All Purpose Towels from Lowes for $12.98. I love them, especially for cleaning mirrors and windows. I would always have streaks when I cleaned with paper towels, but with the microfiber cloth, my mirrors have never looked better! I like that they don't leave any lint behind. I have also attached a microfiber cloth to my Swiffer to clean windows I can't reach by hand and also for cleaning our floors. Just throw them in the wash when they get dirty. They are so versatile! I have seen these come in packs that have their use embroidered on them (kitchen and bathroom, stainless steel, glass and window, dusting and polishing). If you don't feel like you need an 18 pack, I have seen them at Bed Bath Beyond for as low as 99¢.

Dryer Balls
I hate dryer sheets. I think if they dissolved in the dryer, I wouldn't mind them as much, but pulling out a used dryer sheet and throwing it away just kills me. Also, I wanted an alternative for drying baby clothes without chemicals. So I bought a 2 pack of Dryer Max Dryer Balls from Bed Bath and Beyond for $6.99. (I couldn't find them on BB&B's website, but here they are at Target). I am very pleased with them. Usually when I dry sheets, I have to run the dryer a little bit longer because they are still damp. When I used the dryer balls, I did not have to do that. My sheets were still fluffy too. My only complaint would be that they are a little loud as they tumble around the dryer, but we just close the laundry room door.

Glass Cleaner
Skip the Windex, just use water! I have a squirt bottle filled with water for cleaning my windows and mirrors. Paired with my microfiber cloths, my mirrors and windows still get clean and it's one less chemical that I have to use. You can buy an empty spray bottle (check the dollar stores) or you can just refill an old Windex bottle. I have also seen smaller empty spray bottles in the hair section and travel sections of the big box stores.

Homemade Cleaners
I recently started exploring making my own cleaning solutions when I noticed how bothered I was by the smell of the all-purpose cleaner I was using. Sometimes it even gave me a headache. I did a bit of research before making anything and bought a few items such as an empty squirt bottle, a cheese grater, and some cheap measuring cups and spoons. I found all of these items at the dollar store. Here is what I made:

Laundry Detergent
20 Mule Team Borax: $3.49
Arm & Hammer Washing Soda: $3.29
Fels-Naptha Laundry Bar: $1.09
I searched the web for different recipes and found each one had these common elements: soap flakes, washing soda, and borax. I found all three of these items in the laundry section of my local Meijer and it cost around $8 total (much cheaper than a bottle of detergent!). I grated the Fels Naptha bar with a cheap cheese grater (took at least 10 minutes to grate!). Then I added 2 cups of 20 Mule Team Borax and 2 cups of Arm & Hammer Washing Soda, put it in an airtight container and mixed it all together. I use 2 tablespoons in my laundry. Everything comes out nice and clean! I have a top load washer, but I have read for front load washers, it works best to just put the mixture directly in the washer instead of the dispenser.

All-Purpose Cleaner
This cleaner was the reason I wanted to try homemade cleaners in the first place. I used:
   2 cups of Water
   1/2 teaspoon Dish Soap
   1 teaspoon Baking Soda
   2 tablespoons White Vinegar
   3 drops of Essential Oil
I already had all of those ingredients at home with the exception of the essential oil. I went to GNC to find essential oils. They had quite a few to choose from. I like lemon so I went with that one. It cost $5.99 for a little bottle. I put all of the ingredients into a spray bottle and mixed them up. (I accidentally did not close the spray part, so when the baking soda and vinegar combined, my mixture started shooting out of the spray part! Oops!) I smelled it without the essential oil added because I wanted to see if I needed to add it; it smelled like a dish soap and vinegar combination, which didn't smell very pleasant, so I was glad I had the essential oil in the end. I used an apple scented dish soap and I wish I would have used lemon scented instead to bring more of the lemon smell out. Overall it seems to work nicely. I have read online that the vinegar and baking soda cancel each other out after a while. I have seen other recipes that replace the baking soda with borax instead. I have not tried that yet, maybe next batch.

Toilet Bowl Cleaner
I also saw a lot of different recipes for toilet bowl cleaner on the web, but decided to try this one. It takes 1/4 cup vinegar and 10 drops of essential oil (to help with that nasty vinegar smell). To use it, you sprinkle some baking soda in the bowl, squirt with the vinegar and oil and clean with a toilet bowl brush. Overall, I thought this recipe worked well. You really don't need to use that much of the vinegar and oil mixture, I used just enough to hear the baking soda and vinegar fizz. I decided that I wanted a squeeze bottle for the cleaner, so I got a clear condiment bottle from Garden Ridge. It was $2.99 for a 3 pack. My only complaint is it is always open (there is not cap on the top)! I didn't think about that until afterward. I will probably transfer it to an old toilet bowl cleaner bottle after one gets used up.

Any other suggestions on going "green" with your cleaning?

Next week, we will finish the series with cleaning tips and tricks!